Webhook Node Guide
Overview
The Webhook Node is a powerful component of NINA workflows that enables direct HTTP-based communication with external web services and APIs. Webhook Nodes allow you to send data from your workflow to external systems or services through standard HTTP methods, with support for custom headers, request signing, and content formatting.
Use Cases
- Sending security findings to third-party services
- Triggering external systems based on workflow results
- Notifying external teams about detected vulnerabilities
- Posting scan results to custom endpoints
- Integrating with CI/CD pipelines and deployment systems
- Sending alerts to security monitoring platforms
- Pushing data to custom dashboards or analytics systems
Creating a Webhook Node
Basic Setup
- Drag a Webhook Node from the node palette onto your workflow canvas
- Connect it to an input source if desired
- Configure the webhook URL and method
- Set up request headers and content formatting
- Configure signature method if required

URL and Method Configuration
- In the node configuration panel, enter the target URL in the "URL" field
- Select the HTTP method from the dropdown (POST, GET, PUT, PATCH, DELETE)
- The default method is POST if not specified
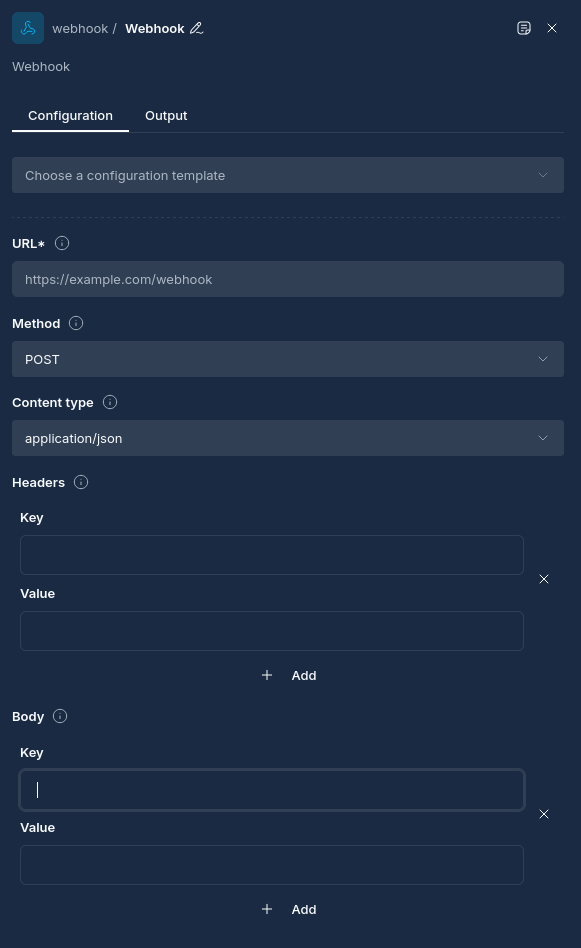
Configuration Options
Node Properties
| Property | Description |
|---|---|
| Name | A descriptive name for the node |
| URL | The target URL to send the webhook request to |
| Method | HTTP method to use (GET, POST, PUT, PATCH, DELETE) |
| Request Body | Data to include in the request body (merged with upstream data) |
| Headers | Custom HTTP headers to include in the request |
| Content Type | The content type of the request (default: application/json) |
| Signature Method | Method for signing the request payload (none, hmac-sha1, hmac-sha256) |
| Signature Key | The key used for signing the request payload |
| Signature Header | The header where the signature will be included |
Request Signing
Webhook Nodes support signing requests for added security:
- HMAC-SHA1: Uses HMAC with SHA-1 hash algorithm
- HMAC-SHA256: Uses HMAC with SHA-256 hash algorithm (more secure)
When configured, the node will:
- Generate a signature of the request body using the specified algorithm
- Add the signature as a custom header to the request
- The receiving system can verify the signature to ensure request authenticity
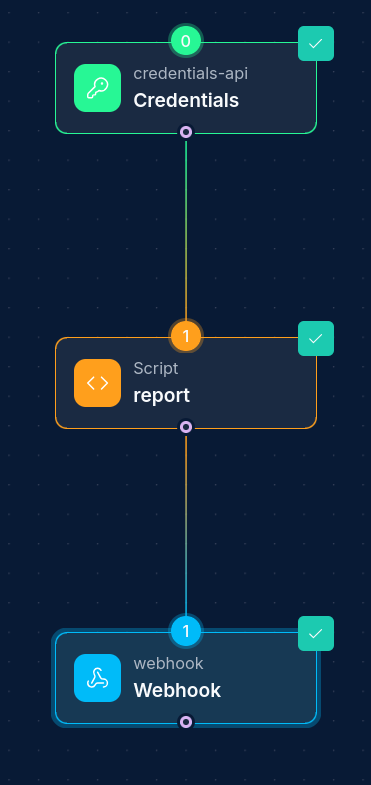
How Webhook Nodes Work
When a workflow is executed:
- The Webhook Node receives input data from upstream nodes if provided
- It examines each input for a "request_body" field:
- If found, only the "request_body" field is extracted and merged with the node's request body
- The request body is converted to JSON
- If signature is enabled, the payload is signed using the specified method
- Headers are added to the request (custom headers and content type)
- The HTTP request is executed to the target URL
- The response from the external service is captured
- The response is stored as the node output and made available to downstream nodes
Parameter Merging
Webhook Nodes merge parameters from multiple sources following specific rules:
- Node Parameters: Parameters configured directly in the Webhook Node's "Request Body" section
- Input Data: Data received from upstream nodes
The input data is processed as follows:
- If the input data contains a "request_body" field, only this field is merged with the node's request body
The merging process follows these rules:
- Node parameters take precedence over input data from upstream nodes
- For arrays with the same key, values are combined without duplicates
- For nested maps/objects, a deep merge is performed
This behavior allows you to:
- Configure baseline parameters directly in the Webhook Node's Request Body
- Override or extend these parameters with data from upstream nodes
- Structure Script Node output to explicitly control what gets included in the webhook request
Best Practices
- Request Signatures: Use request signing for secure webhook communication
- Descriptive Naming: Give your Webhook Node a clear name that indicates what service it integrates with
- Custom Headers: Use custom headers for authentication and identification
- Timeout Configuration: Be aware of the default 60-second timeout for webhook requests
- Content Type: Set the appropriate Content-Type header for your data format
- Response Handling: Validate responses from webhook targets in downstream nodes
- Structured Data: Use a Script Node to format data with a "request_body" field for explicit control
- Parameter Configuration: Set common or default parameters in the Webhook Node's Request Body configuration
- Static vs. Dynamic Data: Use the Webhook Node's Request Body for static data and Script Node output for dynamic data
Example Configurations
Example 1: Simple Notification Webhook
Configuration:
{
  "url": "https://hooks.example.com/services/T00000000/B00000000/XXXXXXXXXXXXXXXXXXXXXXXX",
  "method": "POST",
  "request_body": {
    "text": "Security scan completed with findings",
    "channel": "#security-alerts"
  },
  "content_type": "application/json"
}
Example 2: Signed Webhook with Custom Headers
Configuration:
{
  "url": "https://api.securityplatform.example.com/webhooks/findings",
  "method": "POST",
  "headers": {
    "X-API-Key": "your-api-key-here",
    "X-Source": "NINA-Workflow"
  },
  "signature_method": "hmac-sha256",
  "signature_key": "your-shared-secret-key",
  "signature_header": "X-Signature",
  "content_type": "application/json"
}
Example 3: Webhook with Data Transformation
Use a Script Node before the Webhook Node to transform data. The Script Node should output JSON that includes a "request_body" field:
Script Node Output JSON Structure:
{
  "request_body": {
    "summary": "Security scan completed with 5 findings",
    "severity": "high",
    "target": "example.com",
    "findings": [
      {
        "name": "SQL Injection",
        "severity": "high",
        "description": "SQL injection vulnerability found in login form"
      },
      {
        "name": "XSS",
        "severity": "medium",
        "description": "Cross-site scripting vulnerability in comment form"
      }
    ]
  }
}
Webhook Node:
{
  "url": "https://incident-tracker.example.com/api/v1/incidents",
  "method": "POST",
  "headers": {
    "Authorization": "Bearer your-token-here"
  }
}
Troubleshooting
| Issue | Resolution |
|---|---|
| Connection timeout | Check network connectivity and increase timeout if needed |
| Authentication failures | Verify API keys, tokens, or signature configuration |
| Invalid response format | Check if the API is returning the expected data format |
| 4xx HTTP errors | Verify request format, headers, and authentication |
| 5xx HTTP errors | External service may be unavailable |
| Missing request body | Ensure upstream nodes are providing the expected data |
| Signature validation failures | Check signature method, key, and header configuration |
Next Steps
After configuring your Webhook Node, you might want to:
- Add a Script Node to process the webhook response data
- Add conditional workflow paths based on the webhook response
- Set up error handling for failed webhook requests
Updated: 2025-12-02