Integration Node Guide
Overview
Integration Nodes allow you to connect your NINA workflows with external systems and services. These nodes provide seamless interaction with platforms like Slack, Jira, OpenCTI, and more, enabling you to both retrieve data from and send data to these services.
Use Cases
- Sending notifications to Slack channels
- Creating Jira tickets based on security findings
- Retrieving threat intelligence from OpenCTI
- Accessing email information via Outlook
- Sending reports to security platforms like CrowdStrike
- Retrieving credentials from Zynap's credential management systems
- Performing malware analysis using Zynap's internal integration
- Performing detailed CVE lookup using Zynap's integration
- Posting results to custom APIs or services
Creating an Integration Node
Basic Setup
- Drag an Integration Node from the node palette onto your workflow canvas
- Connect it to an input source (typically containing data for the integration)
- Select the integration service (e.g., Slack, Jira, etc.)
- Choose the resource type and operation
- Select a saved credential for authentication
- Configure operation-specific parameters
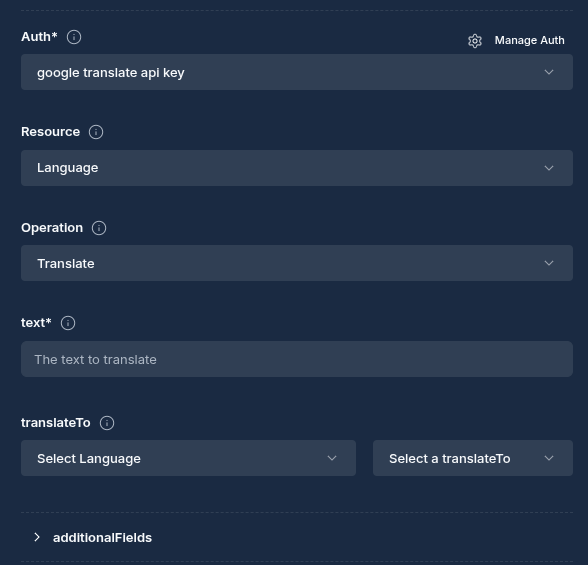
Integration Selection
- In the node configuration panel, select an integration service such as Jira
- Select a saved credential to use for authentication
- Choose the resource type you want to interact with (e.g., "channel" for Slack, "issue" for Jira)
- Select the operation to perform (e.g., "post_message" for Slack, "create_issue" for Jira)
Credential Configuration
Before using an Integration Node, you need to set up credentials for the service you want to integrate with.
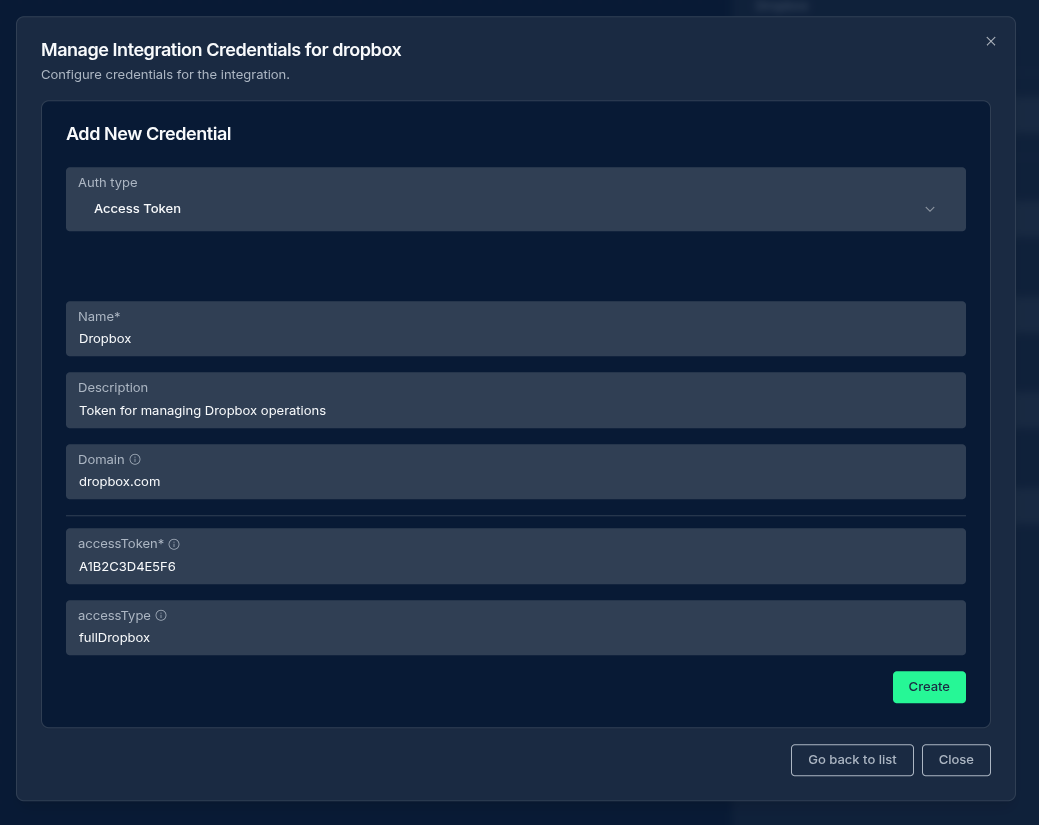
Creating and Managing Credentials
- Drag and drop an integration node (Slack, Jira, etc.)
- Within the credentials section, click "Add New Credential"
- Fill in the credential details:
- Name: A descriptive name for the credential
- Description: Optional details about the credential's purpose
- Auth Type: The authentication method (API Key, Basic, OAuth2, etc.)
- Domain: The domain or instance URL for the service (e.g.,
acme.atlassian.netfor Jira) - Service-specific fields: Depending on the chosen integration service fill out the appropriate fields
Credential Properties
| Property | Description |
|---|---|
| Name | A descriptive name for the credential |
| Description | Optional details about the credential's purpose |
| Integration Service | The service of integration this credential is for |
| Auth Type | The authentication method used |
| Domain | The domain or instance URL for this credential |
| Service-specific fields | Fields vary based on the integration service and auth type |
Credential Security
All sensitive credential data is:
- Encrypted before storage
- Never exposed in API responses
- Automatically refreshed when using OAuth2 tokens
Configuration Options
Node Properties
| Property | Description |
|---|---|
| Name | A descriptive name for the node |
| Integration Service | The service to connect with (Slack, Jira, etc.) |
| Resource | The resource type within the service (can be overridden at runtime by upstream data) |
| Operation | The action to perform on the resource (can be overridden at runtime by upstream data) |
| Credential | The saved credential to use for authentication |
| Parameters | Service-specific configuration parameters |
Parameter Merging
A powerful feature of Integration Nodes is their ability to merge parameters from multiple sources:
Parameter Sources (in order of precedence)
- Node Parameters: Parameters configured directly in the Integration Node
- Extracted Parameters: Parameters automatically extracted from the input data
- Input Data: The complete input data from upstream nodes
How Parameter Merging Works
When an Integration Node executes:
- It first reads the input data from upstream nodes (requires JSON format)
- The integration service extracts relevant parameters from the input data based on the selected resource and operation
- These extracted parameters are merged with the node's configured parameters
- The node parameters take precedence over extracted parameters for any overlapping keys
- Any remaining input data fields are also included in the final parameter set
- The combined parameters are then used when executing the integration operation
Example of Parameter Merging
Let's say you have:
Input Data from Previous Node:
{
  "findings": [
    {"severity": "high", "description": "SQL Injection found"},
    {"severity": "medium", "description": "XSS vulnerability"}
  ],
  "host": "example.com",
  "scan_date": "2024-04-24"
}
Node Parameters (configured in the Integration Node):
{
  "channel": "#security-alerts",
  "title": "Security Scan Results for {{host}}",
  "color": "#FF0000"
}
Final Merged Parameters (used in the operation):
{
  "channel": "#security-alerts",
  "title": "Security Scan Results for example.com",
  "color": "#FF0000",
  "findings": [
    {"severity": "high", "description": "SQL Injection found"},
    {"severity": "medium", "description": "XSS vulnerability"}
  ],
  "host": "example.com",
  "scan_date": "2024-04-24"
}
Special Handling for Arrays
When two sources provide an array under the same key:
- If one side is empty or both sides are identical, the array is preserved as-is
- Otherwise, the arrays are concatenated with cross-list deduplication
Duplicates within a single array are never collapsed. For operations that use
parallel arrays paired by index (e.g. Recorded Future's subjects_login +
subjects_domain), supply them from a single source so dedup never runs and
index alignment is preserved.
Dynamic Resource and Operation Selection
By default, an Integration Node uses the Resource and Operation you pick in its configuration panel. You can also let an upstream node decide them at runtime — useful when an AI agent or Script Node determines which action to take based on the data it processed.
To override, have the upstream node include a resource and/or operation field in its output JSON:
- A non-empty
resourcefrom upstream replaces the node's selected Resource. - A non-empty
operationfrom upstream replaces the node's selected Operation. - You can send both together, or just one — any field the upstream output doesn't include keeps the node's configured selection.
- If neither is present, the node uses its configured selections as normal.
For example, if the node is configured as Slack Channel → Get All and the upstream output contains only {"operation": "History"}, the node runs Channel → History (Resource from the node, Operation from upstream).
What value to pass
Use the exact display name shown in the node's Resource and Operation dropdowns — for Slack, that's Channel and Get All. Copy them as they appear in the dropdown.
To make a Slack node list channels at runtime, the upstream node would output:
{
  "resource": "Channel",
  "operation": "Get All",
  "limit": 100
}
This runs Slack Channel → Get All, with limit passed through as a parameter. The resource and operation fields are used only to select the action and are not passed to the operation as parameters — only the remaining fields (here, limit) are.
Capitalisation and spacing don't need to be exact —
Get All,get all, andget-allall work — but copying the display name as shown in the dropdown is the reliable choice.
How Integration Nodes Work
When a workflow is executed:
- The Integration Node receives input data from upstream nodes
- It retrieves the specified credential for the integration service
- If using OAuth2, the system automatically refreshes tokens if needed
- It determines the resource and operation to run — from the node's configuration, or from
resource/operationvalues in the upstream data if present - Parameters are merged from all sources (node parameters, extracted parameters, and input data)
- The node authenticates with the target service using the credential data
- The node executes the operation on the target service with the merged parameters
- The response from the service is formatted and made available to downstream nodes
OAuth2 Authentication Flow
For integration services using OAuth2:
- Create a credential with OAuth2 auth type
- Complete the OAuth2 authorization flow through the user interface
- The system securely stores the access token and refresh token
- When the Integration Node runs, it automatically:
- Checks if the access token is valid
- If expired, uses the refresh token to obtain a new access token
- Handles the authentication without manual intervention
Example Configurations
Example 1: Creating a Jira Ticket with Merged Parameters
Node Parameters:
{
  "integration_service": "jira",
  "resource": "issue",
  "operation": "create_issue",
  "parameters": {
    "project_key": "SEC",
    "issue_type": "Task",
    "labels": ["security", "automated"]
  }
}
Input Data from Previous Node:
{
  "summary": "Critical vulnerability found in web application",
  "description": "SQL Injection vulnerability detected in login form",
}
Final Merged Parameters:
{
  "project_key": "SEC",
  "issue_type": "Task",
  "labels": ["security", "automated"],
  "summary": "Critical vulnerability found in web application",
  "description": "SQL Injection vulnerability detected in login form",
}
Best Practices
- Use Descriptive Names: Give your Integration Node and credentials clear names
- Secure Credentials: Keep OAuth client secrets and API keys secure
- Layer Parameters: Use the parameter merging feature to establish defaults in the node configuration while allowing overrides from input data
- Data Transformation: Consider using a Script Node before the Integration Node to format data correctly
- Test Credentials: Verify credential connectivity
Troubleshooting
| Issue | Resolution |
|---|---|
| Authentication failures | Verify credential configuration and ensure tokens are valid |
| Missing parameters | Check the required parameters for the specific operation |
| Parameter merging issues | Verify input data structure and parameter naming |
| Unknown resource/operation | When overriding from upstream data, ensure the value matches a Resource/Operation display name shown in the node's dropdown |
| OAuth token expiration | Check if the refresh token is still valid; re-authenticate if needed |
Next Steps
After configuring your Integration Node, you might want to:
- Add Script Nodes to transform data into the format expected by the service
- Add conditional branches based on service responses
- Chain multiple integrations together for complex workflows

Updated: 2026-06-08